Build an RF Group initiative
You create an RF Group initiative for a single RFGroup. RF Group initiatives do not require an administrator to set the status.
NOTE: You cannot add data to actuals periods for initiatives.
To build an RF Group initiative:
- Open the plan file for the RFGroup.
-
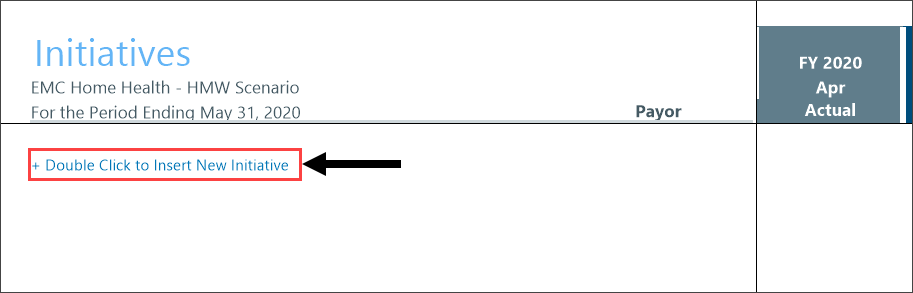
On the Initiatives tab, double-click Double Click to Insert New Initiative.
-
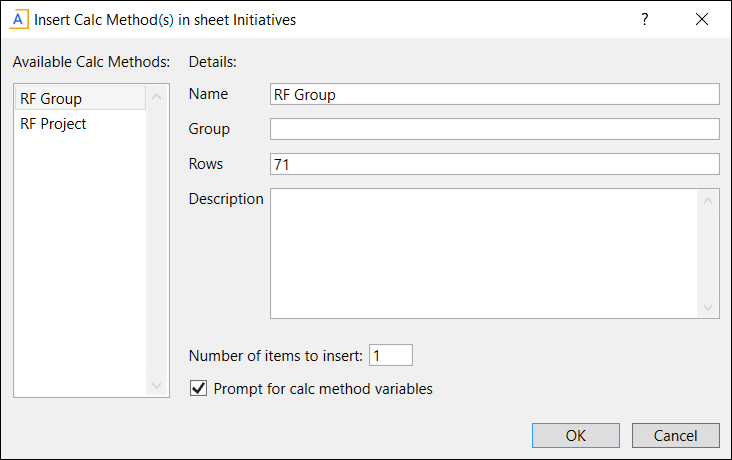
In the Insert Calc Method(s) in sheet Initiatives dialog, select RF Group, and then click OK.
-
In the Calc Method Variables dialog, in the Input New Initiative Name field, type a name that describes the initiative’s RFID using 50 characters or less, and then click OK.
NOTE: This RFID Description (for example, Home Health Expansion) is saved to the RFID dimension table and is easily discernible to the administrator.
The RFID is created automatically in the plan file using the RFGroup name and the scenario number, and then numbered (starting with 1) for that combination of RFGroup and scenario (for example, EMC_HomeHealth_16_1, where “16” is the scenario number and “1” is the first initiative for the home Health plan file that uses scenario 16).
The system stores the initiative ID in the RFID table when you save the plan file.
-
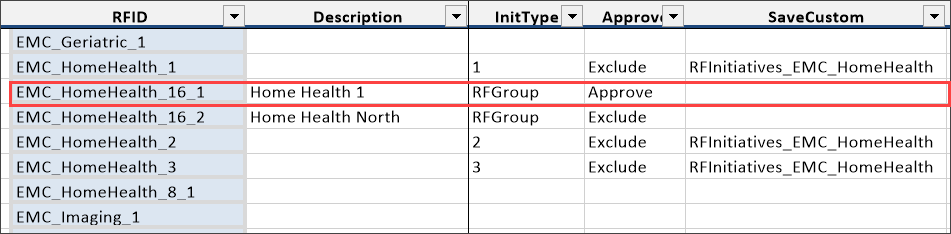
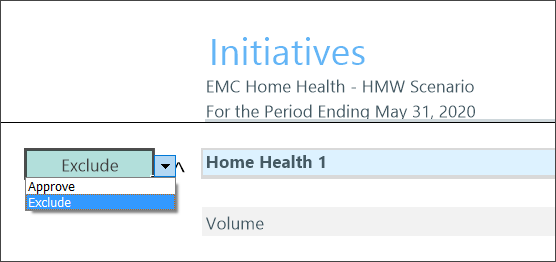
(Optional) To change the initiative's status from Exclude (the default) to Approve, select Approve in the status drop-down.
TIP: You can change this drop-down selection at any time. Changing the status does not affect the data in the initiative, but only whether the data appears in reports and on the other plan file tabs.
NOTE: Approvals for RF Group initiatives should only be changed in the plan file or the Initiative Status Update utility, not the RFID dimension table.
-
If you are forecasting Patient Revenue for your initiative, you must create Volume (Statistics) first before working on Patient Revenue.
-
Complete the following sections in the sheet:
 Volume (statistics)
This section uses the Volume calculation (calc) method for statistics (see RFCODE.InitStdLine), which allows for manual adjustments each period.
-
In the Volume section, double-click Double Click to Insert New Volume.
- In the Calc Method Variables dialog:
- For Select Volume Code, click Choose Value, select the volume code, and then click OK.
- (Optional) For PAYOR, click Choose Value, select a payor, and then click OK.
- Click OK.
-
In the relevant columns, add your volume amounts to the periods.
NOTE: If you populate your first forecast column with your initial volumes, the same number will be forecasted to the remaining periods, so you must review the other periods and adjust as needed. If you are forecasting monthly, the amounts entered in the monthly columns are tallied automatically and populated in the quarterly columns.
Patient Revenue
This section uses the Revenue calc method (see RFCODE.InitStdLine), which uses a rate-per-volume calculation.
- Under Patient Revenue, double-click Double Click to Insert New Patient Revenue.
- In the Calc Method Variables dialog:
- For Select Revenue Code, click Choose Value, select the applicable RFCode, and then click OK.
(Optional) For PAYOR, click Choose Value, select a payor, and then click OK.
-
Click OK.
-
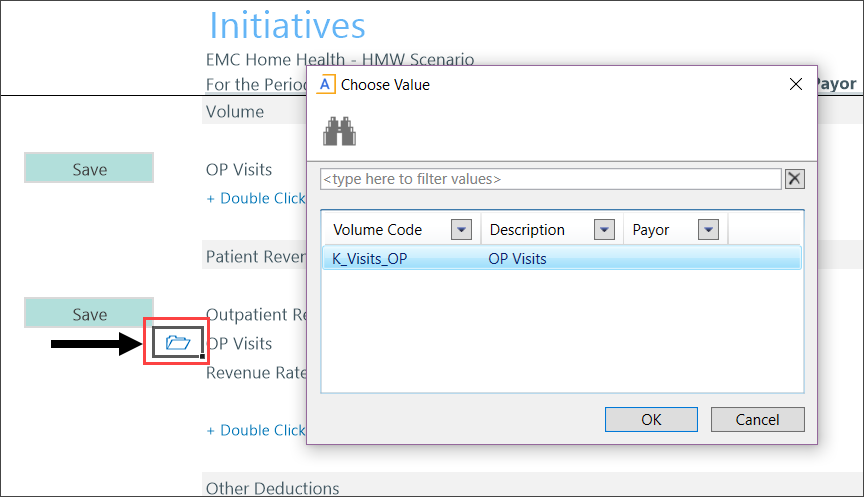
Assign the volume driver related to the Volume section by double-clicking the folder icon, selecting the volume code, and then clicking OK.
-
In the first forecast period column in the Revenue Rate row, enter the dollar amount for the revenue rate (for example, $300).
NOTE: After you assign the revenue rate, the revenue is projected for the rest of the forecast periods.
Other Deductions
This section uses the Deductions calculation (calc) method (see RFCODE.InitStdLine), which allows for manual adjustments each period.
-
Under Other Deductions, double-click Double Click to Insert New Deduction.
-
In the Calc Method Variables dialog:
-
For Select Deduction Code, click Choose Value, select the appropriate RFCode, and then click OK.
-
(Optional) For PAYOR, click Choose Value, select a payor, and then click OK.
-
-
Click OK.
When you enter the rate in the first forecast period column, that number is copied to the remaining periods. You can adjust the remaining periods as needed.
NOTE: You do not need to enter your deductions as a negative number for a contra revenue (debit) entry. Enter deductions as a positive number; the system subtracts the amount from the revenue.
Other Revenue
This section uses the Revenue calculation (calc) method (see RFCODE.InitStdLine), which allows for manual adjustments for each period.
-
Under Other Revenue, double-click Double Click to Insert New Other Revenue.
-
In the Calc Method Variables dialog, click Choose Value, select the RF Code, and then click OK.
-
Click OK.
-
In the first forecast period column, enter the other operating revenue.
If you populate the first forecast period column, it forecasts the same number to the remaining periods. You can adjust the remaining periods as needed.
Salaries
This section uses the Salary calculation (calc) method (see RFCODE.InitStdLine), which is an hourly calculation based on the number of FTE Full time employees and hours forecasted within that period. This calculation allows a manual adjustment for FTEs and Salary rates for each period in the current and next period columns.
-
Under Salaries, double-click Double Click to Insert New Salary.
-
In the Calc Method Variables, click Choose Value, select the salary code, and then click OK.
-
Click OK.
-
In the FTEs row for first forecast period column, enter the number of FTEs.
-
In the Salary Rate row, enter the rate as a dollar amount.
The amounts are copied to the rest of the forecast columns, but you can adjust them as needed. The salaries and hours are calculated automatically by the system.
Benefits
This section uses the Benefit calculation (calc) method (see RFCODE.InitStdLine). The Benefit code you select determines how the benefits are calculated.
-
Under Benefits, double-click Double Click to Insert New Benefit.
-
In the Calc Method Variables, click Choose Value, select the Benefit code, and then click OK.
-
Click OK.
-
In the Rate per FTE row for first forecast period column, enter the rate.
-
In the % of Salaries row, enter the percentage amount.
-
(Optional) In the Adjustment Amount row, enter an adjustment.
All other expenses (Supplies, Purchased Services, Other Expenses, and so on) use the Line Item calculation (calc) method, which allows for manual adjustments each period.
If you populate the first period column, the same number is copied to the remaining periods. You can adjust the remaining periods for inflationary adjustments.
-
-
(Optional) To remove any items you added to any of the sections, select Delete from the Save drop-down. When you save the plan file, that item is removed from the Initiative sheet.
-
In the Main ribbon tab, click Save.
